
TigerSpool

A small box beside the printer. Tap a slot, hold a spool against it, and the filament is written into that slot — on any brand of printer.
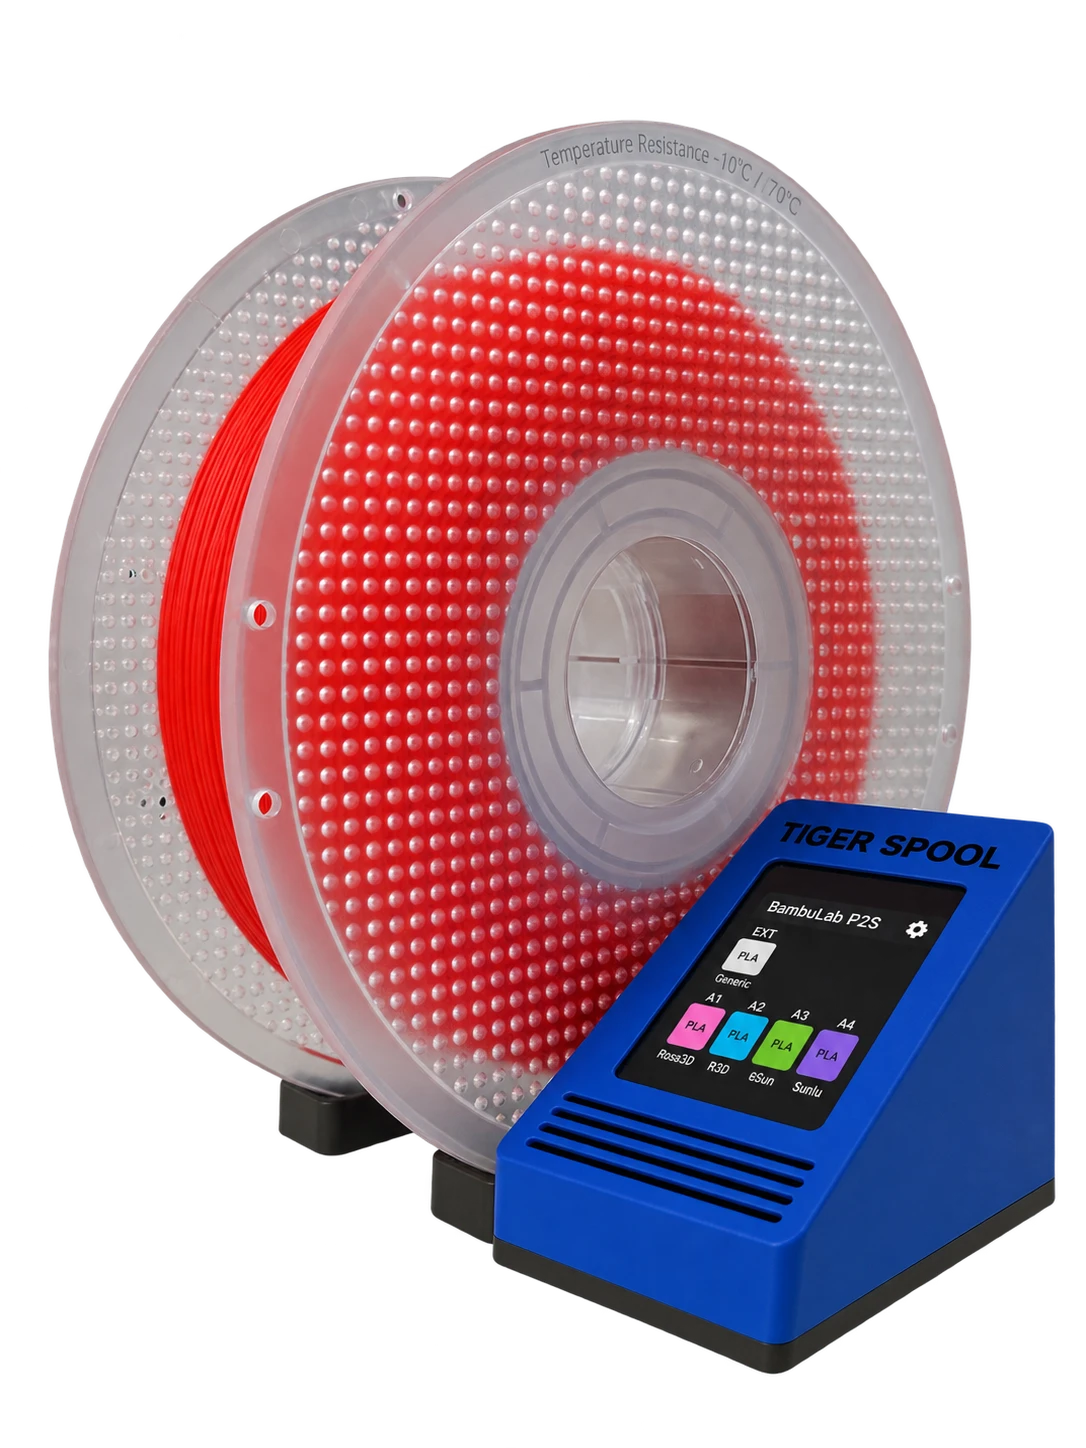
The box, a spool, and the printer’s own slots on screen — each one showing what is loaded in it. Pick a slot, hold the spool against the box, done.
 Sources
Your printer already keeps a list of slots. Your spool already carries its own identity. TigerSpool is the thirty centimetres between the two: no app to open, no keyboard, nothing retyped that the chip already knows.
Open source under MIT, ESP32-S3, about 40 € of common parts.
What it does
Section titled “What it does”- Tap the slot you want on the touchscreen — the same slot names the printer itself uses.
- Hold the spool to the box. The TigerTag chip is read on contact, and the assignment leaves for the printer at once, over that brand’s own protocol: material, brand, colour and temperatures, in the right slot. There is nothing to confirm.
- Load the spool. The box tells you which slot it went to.
It speaks nine languages, asks which one before anything else, and updates itself over the air.
Where it sits
Section titled “Where it sits”flowchart LR TAG["Spool with a TigerTag chip"] -- "held against" --> SP["TigerSpool<br/>ESP32-S3 + PN532, 2 inch touchscreen"] ST["Tiger Studio"] -- "your account: printers and slots" --> SP SP -- "the brand's own protocol" --> PR["Your printer's slot"]
TigerSpool is not a chip writer — that is the TigerPOD’s job, on the desk. TigerSpool takes an identity that already exists and puts it where the printer expects it.
What has to exist first
Section titled “What has to exist first”This is what catches people out, so it comes before the hardware.
The box has no keyboard and no way to type a printer’s address, deliberately. It reads your printers from your TigerSystem account, which means two things must exist before it is useful:
- An account, created in Tiger Studio. The box signs in to it — by e-mail, or with Google through a QR code, so no password is ever typed on a two-inch screen.
- Your printers, added in Tiger Studio. Address, access code, brand and model all live there.
If you skip this, the printer list on the box is empty. That is not a fault and there is nothing to repair on the device: it is showing you exactly what your account contains. Add the printer in Tiger Studio and it appears at the next sync.
In short: Tiger Studio → create an account → add your printers → then set up the box.
Which printers
Section titled “Which printers”The six brands Tiger Studio integrates are covered — written, and tested on hardware. That is not every printer on the market, and “any printer” stays the goal; it is every brand this ecosystem speaks to today:
| Brand | Firmware | Transport |
|---|---|---|
| Creality | implemented, proven | WebSocket |
| FlashForge | implemented, proven | HTTP |
| Bambu Lab | implemented, proven | MQTT over TLS |
| Snapmaker | implemented, proven | Moonraker over WebSocket |
| Elegoo | implemented, reading proven — writing not yet confirmed on a printer | MQTT |
| Anycubic | implemented, reading proven — writing not yet confirmed; LAN mode only | MQTT over TLS |
Slot names follow the printer’s own: Ext. and 1A–1D on Creality and
FlashForge, A1–A4 then B1–B4 on Bambu Lab, E1–E4 on Snapmaker, S1–S4 on
Elegoo’s Canvas, and one letter per ACE unit on Anycubic — A1, A2… then
B1… for a second box.
Check the per-brand status before buying parts for a specific machine.
Build one
Section titled “Build one”Three things to buy, four wires, one printed shell — plus two extras worth considering. The electronics are identical for every printer brand — only the shell changes, which is what keeps it to one firmware and one parts list.
| Qty | Component | Where |
|---|---|---|
| 1 | Waveshare ESP32-S3-Touch-LCD-2 development board — 2.0” 240×320 IPS capacitive touch, ESP32-S3R8, 16 MB flash, 8 MB octal PSRAM. Screen, touch panel and MCU on one board, and the 16 MB is what makes two OTA slots comfortable | Amazon |
| 1 | PN532 V3 NFC module — DIP switches, must support HSU/UART, both switches to 0 / OFF. A two-pack costs barely more than one |
Amazon |
| 1 | A USB-C cable that carries data — speed is irrelevant, any USB 2.0 data cable does | Amazon |
| 1 | Magnetic USB-C connector — recommended: the port is the part handled every day, and the cable lets go instead of the socket | Amazon |
| 1 | 3.7 V 1000 mAh LiPo cell, PH1.25 — optional, charged over USB; the box then runs cable-free. The board cannot detect a cell, so you declare it in Settings › Battery. Check the polarity | Amazon |
Some links in this table are Amazon affiliate links: as an Amazon Associate, TigerTag earns from qualifying purchases, at no extra cost to you. It helps fund the open protocol. Buying the same parts anywhere else works exactly as well.
The four jumper wires come with the PN532 — 3V3, GND, TX, RX, and that is the whole harness. No level shifters: the PN532 runs at 3V3, same as the board. A battery is optional — the box normally sits beside a printer that is already plugged in, and the cell above is for the times it does not.
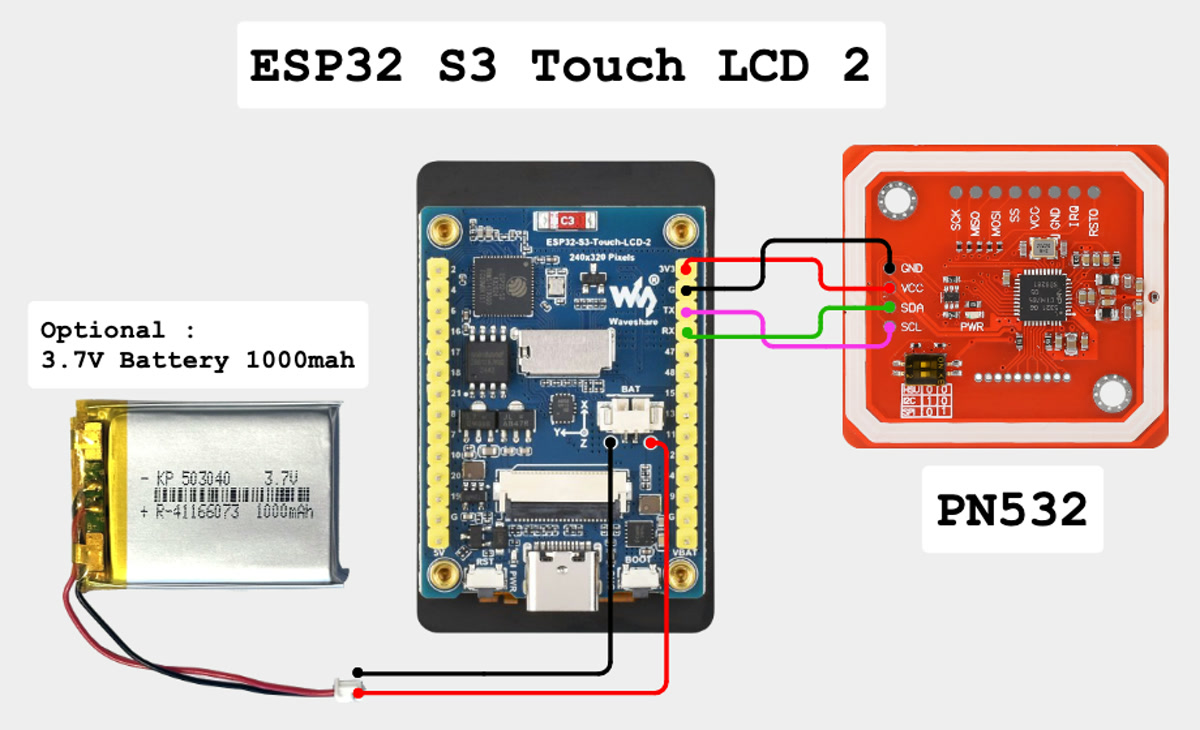
The whole harness. On the PN532 the two data pins are silkscreened SDA and
SCL — in HSU mode they carry the UART: the board’s TX goes to SCL, its
RX to SDA, and both DIP switches sit at 0 / OFF.
Interactive schematic.
Flashing is done from the browser — plug the board in, click Install, wait a minute. Chrome, Edge or Opera on a desktop; Safari and Firefox do not implement WebSerial, and no mobile browser does.
Install it from your browser →
Three traps worth knowing before you order
Section titled “Three traps worth knowing before you order”- The reader goes on GPIO43/44, never GPIO6/7. That pair is an I²C bus with pull-ups on this board: a PN532 wired there powers up, answers, and returns random UIDs with failing reads. It looks like a bad tag. It is not, and it costs a day.
TXDcrosses to the board’s RX,RXDto its TX. Transmit talks to receive. If the reader reports firmware version 0 at boot, swap those two before changing anything else.- A charge-only USB cable makes a working board look dead. The screen lights up and no serial port ever appears, so the web installer finds nothing to install to. Use a cable you know transfers files.
Waveshare sells several similar boards; the 1.28”, 1.69” and 3.5” ones in the same family have different panel controllers and pinouts, and this firmware will not run correctly on them. Check the silkscreen, not the listing title.
Full parts list, wiring diagram and bring-up checklist: TigerSpool-RFID.
Where it stands today
Section titled “Where it stands today”Written down rather than discovered:
- The first printed shell is published: a free-standing desktop stand, with the spool on the left or on the right, in Model3D/. Cases that mount on a given printer follow the same rule — same board, same reader, same four wires, same USB-C entry — so one firmware image runs on every model and anyone can contribute one without touching code.
- The firmware is not signed. Its update connection is verified against the root certificate store, so the box knows who it is talking to — but not who produced the image.
- Ten printers connected at once, at most — of the 24 an account can hand it — and no more than three that speak TLS (Bambu Lab, Anycubic), which cost the most memory.
Related: TigerPOD, Tiger Studio, The TigerTag chip, Printer compatibility